16 Aug 2015 - 6 min read
Openframeworks & Pocketsphinx
I wanted to make an openFrameworks app which used Pocketsphinx to do some automatic transcribing of audio files and provide output. In this tutorial I’ll explain how I managed it.
Introduction
When I need to pull something together to test out a quick idea I reach for openFrameworks. It’s an open source toolkit designed for “creative coding”. OpenFrameworks is written in C++ and runs on Windows, Mac OS X, Linux, iOS, and Android.
Recently I also needed a library which could perform speech recognition both on audio files and directly from a microphone. I turned to CMUSphinx, which collects over 20 years of CMU’s research on speech processing. It uses state of the art speech recognition algorithms for efficient processing of audio data.
Within this repository is a library called Pocketsphinx. Pocketsphinx is CMU’s recognition library for embedded devices, but it works just as well on desktop machines too. It depends on SphinxBase which provides common functionality across all CMUSphinx projects. To get started, you need to install Pocketsphinx and Sphinxbase.
I wanted to build an openFrameworks application which used Pocketsphinx for transcribing audio files and output this to my app. I’m using OSX and XCode but the steps will be slightly similar for anyone working on Linux and Windows.
Installing Pocketsphinx
First thing we have to do is to install Sphinxbase and Pocketsphinx by following their tutorial.
Check that sphinx is installed properly by running pocketsphinx_continious.c from the command line. Our only problem here is that sphinx is a 64 bit library by default, and openFrameworks is a 32 library.
Where you built sphinx, run the code below and it should install libraries for i386.
make clean
make CFLAGS="-g -O2 -m32" install
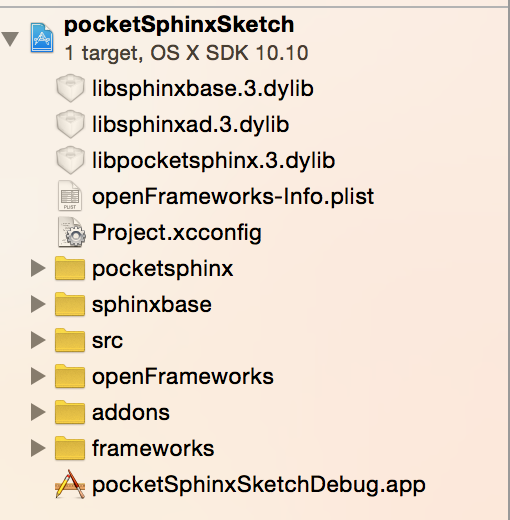
In your Xcode project you’ll need to include the following files, make sure to hit ‘add to target’
/usr/local/include/sphinxbase/
/usr/local/include/pocketsphinx/
/usr/local/lib/libpocketsphinx.3.dylib
/usr/local/lib/libsphinxad.3.dylib
/usr/local/lib/libsphinxbase.3.dylib
And then we’ll set up a few project attributes. First in ‘Header Search Paths’ add
/usr/local/include
and in ‘Library Search Paths’ add
/usr/local/lib
Here’s what you should have by now:
Example App
Now I’ll walk you through an example which reads in a directory of files and processes each one when we press a key.
We start up with some setup, set our directory path, read them through and add them to a vector so we can access them later. It’s important to note that Pocketsphinx only works with files that are 16 bit headerless raw files samples at 16KHz. Now you can do this with a program like Audacity or we can write a bash script which makes use of SoX which does it automatically. You can read how I did that here.
void ofApp::setup()
{
    //some path, may be absolute or relative to bin/data
    ofDirectory dir(directoryString);
    //only show png files
    dir.allowExt("raw");
    //populate the directory object
    dir.listDir();

    //push the file names into our vector
    for(int i = 0; i < dir.numFiles(); i++)
    {
        files.push_back(dir.getName(i));
    }

    myfont.loadFont("helvetica.ttf", 20);
}
Here is where we initialise the engine, the important step is the config call which sets up some parameters for the command line arguments which pocketsphinx uses. MODELDIR is defined in our header file and is specific to where you place the “en-us” language model. Mine was on my desktop so mine was #define MODELDIR “/Users/benjgorman/desktop”.
bool ofApp::engineInit()
{
config = cmd_ln_init(NULL, ps_args(), TRUE, "-hmm", MODELDIR "/en-us/en- us", "-lm", MODELDIR "/en-us/en-us.lm.dmp", "-dict", MODELDIR "/en-us/cmudict-en-us.dict", NULL);


//this is the setup you can use for microphone
//config = cmd_ln_init(NULL, ps_args(), TRUE, "-hmm", MODELDIR "/en-us/en-us", "-allphone", MODELDIR "/en-us/en-us-phone.lm.dmp", "-backtrace", "yes", "-beam", "1e-20", "-pbeam", "1e-20", "-lw", "2.0", NULL);

    if (config == NULL)
    {
        return false;
    }
    ps = ps_init(config);

    if (ps == NULL)
    {
        return false;
    }
}
Here is how we open the engine, and open our file.
int ofApp::engineOpen(string filename)
{
    FILE *fh;
    char const *uttid;
    int16 buf[512];
    int rv; int32 score;

    fh = fopen((directoryString + filename).c_str(), "rb");
    if (fh == NULL)
    {
        return -1;
    }
    rv = ps_start_utt(ps);
    if (rv < 0) return 1;
    while (!feof(fh))
    {
        size_t nsamp; nsamp = fread(buf, 2, 512, fh);
        rv = ps_process_raw(ps, buf, nsamp, FALSE, FALSE);
    }

    engineClose();
}
Here is where we close the engine and perform our final checks.
int ofApp::engineClose()
{
    char const *uttid;
    int rv;
    int32 score;

    rv = ps_end_utt(ps);
    if (rv < 0)
    {
        return 1;
    }
    hyp = ps_get_hyp(ps, &score);
    if (hyp == NULL)
    {
        return 1;
    }

    printf("NEWLINE_________\n\n\nRecognized: %s\n", hyp);

    sentence = hyp;

    process_result();


}
Here we exit the engine, free up some objects etc.
int ofApp::engineExit()
{
    ps_free(ps);
    cmd_ln_free_r(config);
    return 0;
}
Then what we need to do is is transcribe the next file when we press the ‘n’ key.
void ofApp::keyPressed  (int key)
{
    if (key == 'n')
    {
        if (j<files.size())
        {
            bEngineInitialed = engineInit();

            engineOpen(files[j]);

        }
        j++;
    }
}
Last thing to do is simply write the current sentence to the screen!
void ofApp::draw()
{
    // in draw:
    myfont.drawString(sentence +"\n", 100,100);
}
You can download the full example from Github, but remember you need to follow the steps at the start of this tutorial in order to install Pocketsphinx on your system.
Leave a comment and let me know if this all works out for you. I’ll be adding a similar tutorial for getting microphone intput in to work as well.
[Find this full example on Github.
](https://github.com/benjgorman/ofSphinxExample)