27 Mar 2016 - 12 min read
Posting to Twitter with an Arduino via Processing using Twitter4j
Recently I had to teach my students how to produce a physical computing device using Arduino which was talked to Twitter. Without an ethernet or WiFi shield, the best way to accomplish this is letting an Arduino communicate with Processing over a serial connection, which then talks to Twitter. We don’t have to use Processing for anything in particular other than talking to the API. And to talk to the API we can use a library called Twitter4J. Twitter4J is an unofficial Java library for the Twitter API. With Twitter4J, you can easily integrate any Java application (or in our case a Processing sketch) with Twitter.
This tutorial will show you how to connect a couple of buttons to an Arduino and have one of them perform a Twitter search query, and the other one will tweet the current time.
Twitter4j & Twitter Account Setup
First make sure you have: Downloaded and installed Processing Downloaded and installed Arduino Also grab the latest version of Twitter4J
Once it’s downloaded you have to install it in the Processing library folder.
Unzip the downloaded zip folder. Rename the unzipped folder to “twitter4j”. Inside this folder create a new folder called “library”. Next look for a folder called “lib”. Move the file called “twitter4j-core-4.0.4.jar” inside our library folder we just made. Rename that file to “twitter4j.jar”.
Check that you have the following structure /Processing/libraries/twitter4j/library/twitter4j.jar 
Next you have to add a phone number to the account you want to use. I recommend making a test account just for testing out Twitter & Processing. You have to add a phone number to your account in order to use the API. 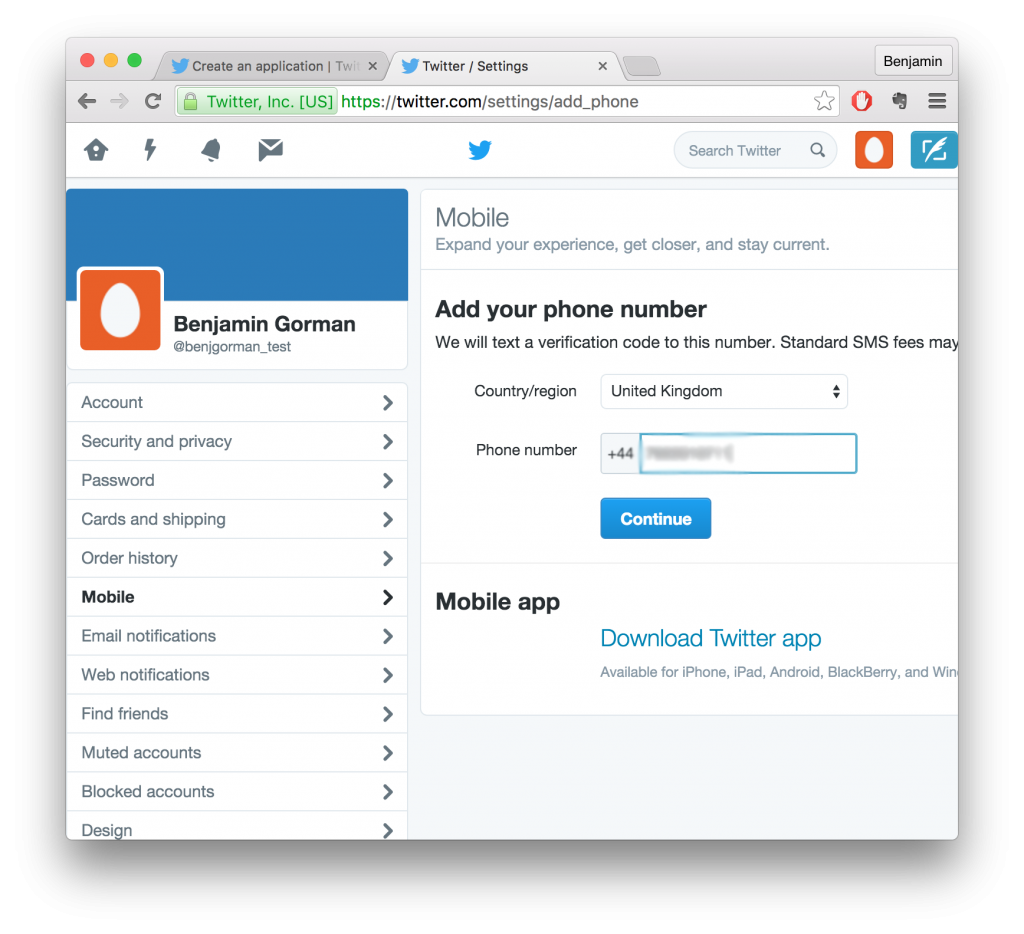
If it’s a UK number you might have some problems, try it with the 0, and you’ll hopefully get a text with the confirmation code. Try replying to the message and if all is good and then you should be able to tweet by texting the number. If not try it without the 0. Repeat until you have success or want to destroy the developer behind this.
Now we have to make an app! Go to apps.twitter.com/ and hit create new app (make sure you are logged in with your new shiny test account). 
Here we have to enter some details about our new app. Give it a name and description. You can change the description later and the name doesn’t really matter as this is just a tutorial. Give it a website address if you have your own use that, or throw in the address for the profile you are using as a test account. Leave Callback URL blank. 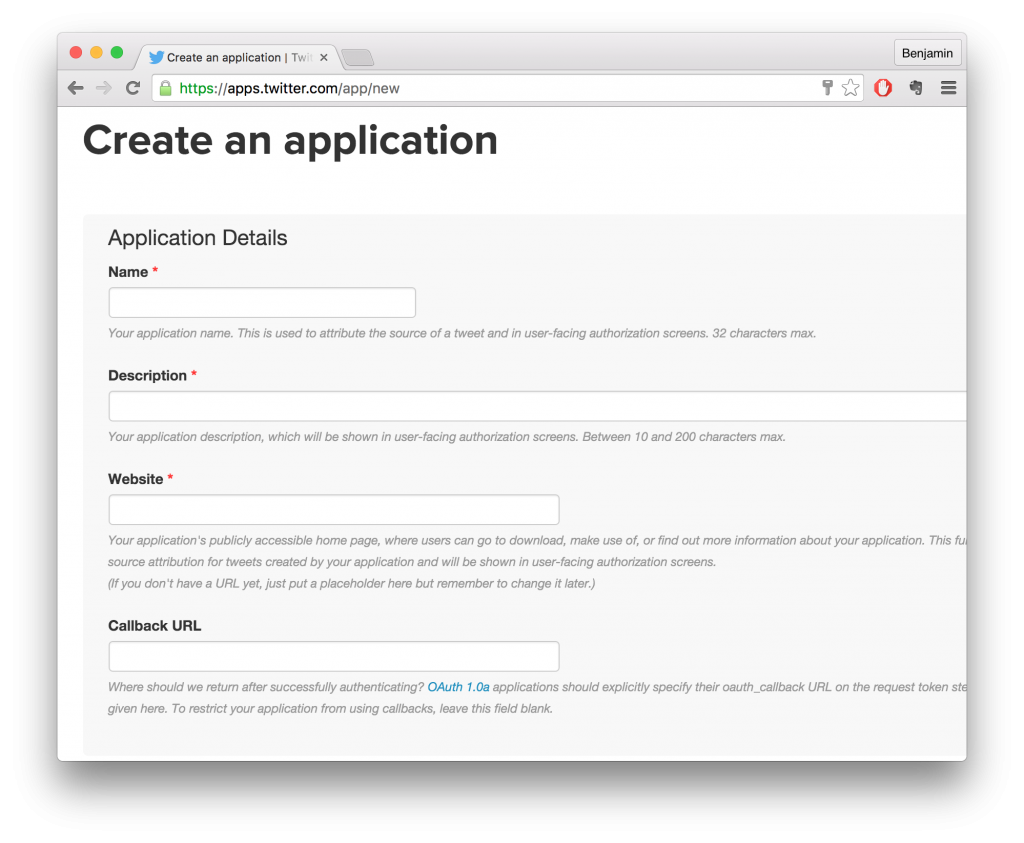
If it all goes well, you’ll see this page. If it doesn’t work and says something about a phone number go back to Step 3. Or fix any other errors it throws up. 
Next click on Keys and Access Tokens. Copy the API Key and the API Secret to a text file. These let anyone with access to them the ability to post from your account. So keep them secret if you haven’t made a test account and be careful if you are putting your code on Github later or sharing it publicly. Scroll down a click “Create my access token”. 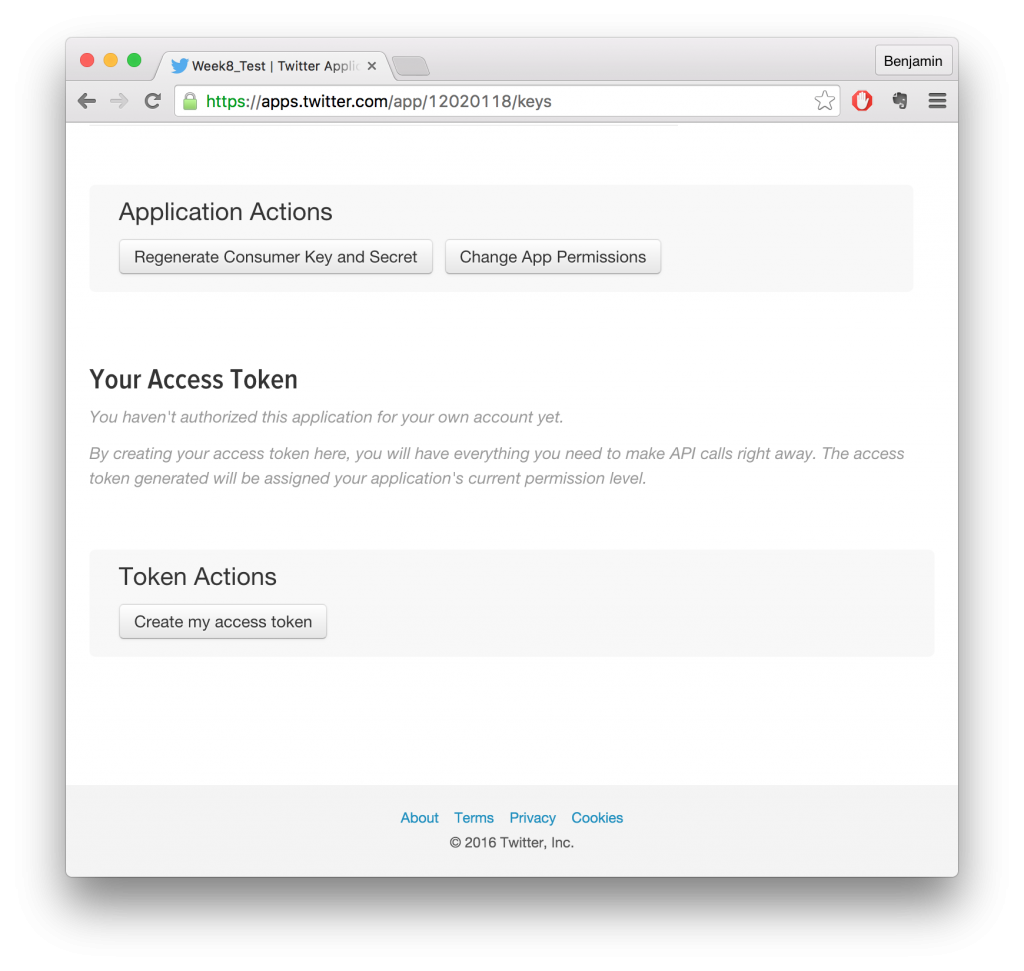
Then add Access Token and the Access Token Secret to your text file too. 
Your text file should be arranged like this, name it secret.txt and save it in the same place as your sketch for this example. 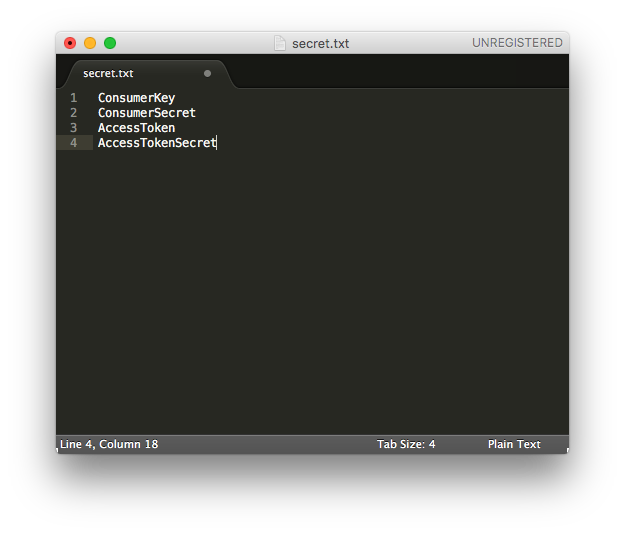
Processing Sketch Code
In our setup, we have to first import all out libraries. And then we have to read in the keys from our text file. And finally setup a twitter object.
//import all the twitter libraries
import twitter4j.conf.*;
import twitter4j.*;
import twitter4j.auth.*;
import twitter4j.api.*;
import java.util.*;
import processing.serial.*;

//make a twitter object
Twitter twitter;

//lines from our text file
String [] lines;

Serial myPort;
String val = null;

//our search string
String searchString = "#glenshee";

//a list of type status from the API
List<Status> tweets;

int currentTweet;

void setup()
{
    size(800,200);
    String portName = Serial.list()[3];
    myPort = new Serial(this, portName, 9600);
    //setup an array to hold every line of the text file
    lines = loadStrings("secrets.txt");

    //sets up each line of the text file to the corresponding key
    ConfigurationBuilder cb = new ConfigurationBuilder();
    cb.setOAuthConsumerKey(lines[0]);
    cb.setOAuthConsumerSecret(lines[1]);
    cb.setOAuthAccessToken(lines[2]);
    cb.setOAuthAccessTokenSecret(lines[3]);

    TwitterFactory factory = new TwitterFactory(cb.build());

    twitter = factory.getInstance();
}
Our draw method is what handles reading from the serial port. We’ll be reading in String data every loop of the draw method until we see TWEET or SEARCH. These are keywords we will use in our Arduino code later.
void draw()
{
  if (myPort.available() > 0)
  {
    val = myPort.readStringUntil('\n');

    if (val !=null)
    {
        if (val.equals("TWEET\n") == true)
        {
          tweet("The time now is: ");
        }
        else if (val.equals("SEARCH\n") == true)
        {
          getNewTweets();
          drawTweets();
        }
    }
  }
}
Our drawTweets() method is what handles drawing 1 tweet to the screen with each press of the button.
void drawTweets()
{
    fill(0);
    rect(0, 0, width, height);

    currentTweet++;

    if (currentTweet >= tweets.size())
    {
        currentTweet = 0;
    }

    //get the object relating to the whole status, including the text, the user, who the user replied to, date etc
    Status status = tweets.get(currentTweet);

    fill(255);

    //make a formatted string, using the real name of the user, their twitter username and the text from the tweet itself
    String formattedData = status.getUser().getName() + " @" + status.getUser().getScreenName() + "\n" + status.getText();

    //draw it to the screen in the center of the screen, constrain the width of the text box to 600 pixels
    text(formattedData, width/2 - (600/2), height/2, 600, 200);

}
Our tweet method tweets the current time. If you adapt this code make sure to keep something unique about each tweet as twitter does not allow you to tweet the same status repeatedly. So here the time acts as our unique difference between each status.
void tweet(String val)
{
    try
    {
        Status status = twitter.updateStatus(val + hour() + ":" + minute() +":" + second() + " via Arduino");
        System.out.println("Status updated to [" + status.getText() + "].");
    }
    catch (TwitterException te)
    {
        System.out.println("Error: "+ te.getMessage());
    }
}
This method gets the new tweets using a searchString based query and adds it to an array of status objects.
//gets the new tweets
void getNewTweets()
{
    //try the search
    try
    {
        Query query = new Query(searchString);
        //get the last 50 tweets
        query.count(50);
        QueryResult result = twitter.search(query);
        tweets = result.getTweets();
    }
    //if there is an error then catch it and print it out
    catch (TwitterException te)
    {
        System.out.println("Failed to search tweets: " + te.getMessage());
        System.exit(-1);
    }
}
Arduino Wiring & Code
For the Arduino section of this tutorial you’ll need:
- An Arduino board such as an Arduino Uno, or a cheap clone.
- A breadboard.
- Two pushbuttons.
- Two resistors at around 220Ω.
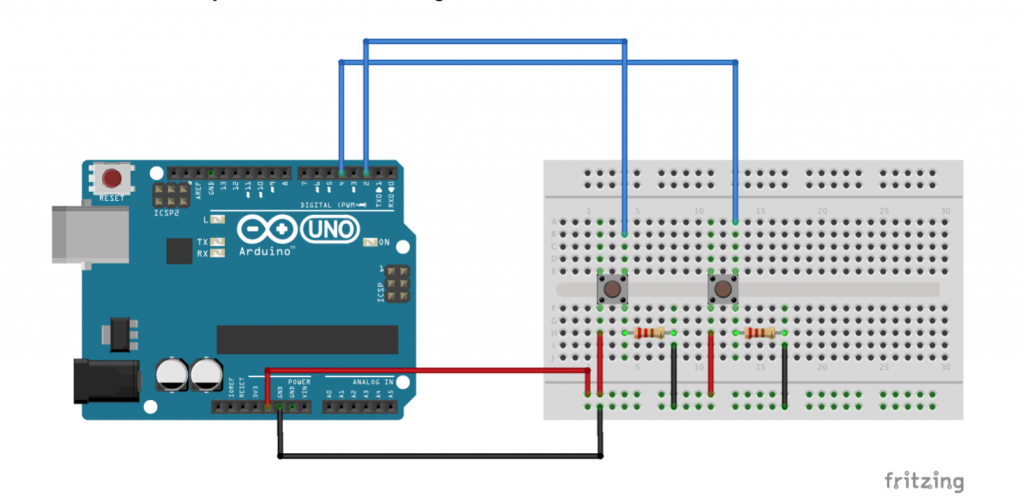
To wire it up put each button across the middle of the breadboard. These are usually quite hard to sit in the breadboard holes so I reccomend flattening them with some needle nose pliers first. Then connect the upper right pin of the buttons are digital input pins, 4 & 2. The lower right pin of each buttons connects to the resistors which are then connected to the ground rail. The lower left pins are connected to the 5v rail. Our resistors are required to pull the input to ground, otherwise we will have a floating input and the buttons won’t work properly.
Our Arduino code is actually quite simple. The main problem with using pushbuttons and talking to processing is debouncing. Debouncing is when a button generates too many open/close transitions when pressed, due to mechanical and physical features of the button itself, and these transitions may be read into our code as multiple input attempts by the user. To solve this, we simply check twice in a short period of time to make sure the pushbutton is definitely pressed down. Without doing this, pressing the button once may cause unpredictable results. I’ve used the millis() function to keep track of the time passed since the button was pressed.
The other interesting part is that when one of the buttons is pressed, we will print “TWEET\n” to the serial console. And when the other button is pressed we will print “SEARCH\n” to the serial console. These strings are then picked up by our serial read in processing and dealt with accordingly.
const int tweetButtonPin = 2;    // the number of the pushbutton pin
const int searchButtonPin = 4;    // the number of the pushbutton pin
const int ledPin = 13;      // the number of the LED pin

int counter = 0;

int ledState = HIGH;
int tweetButtonState;
int lastTweetButtonState = LOW;

int searchButtonState;
int lastSearchButtonState = LOW;

// the following variables are long's because the time, measured in miliseconds,
// will quickly become a bigger number than can be stored in an int.
long lastTweetDebounceTime = 0;
long tweetDebounceDelay = 50;
long lastSearchDebounceTime = 0;
long searchDebounceDelay = 50;

void setup()
{
  Serial.begin(9600);
  pinMode(tweetButtonPin, INPUT);
  pinMode(searchButtonPin, INPUT);
  pinMode(ledPin, OUTPUT);
  digitalWrite(ledPin, ledState);
}

void loop()
{
  // read the state of the switch into a local variable:
  int tweetButtonReading = digitalRead(tweetButtonPin);
  int searchButtonReading = digitalRead(searchButtonPin);
// check to see if you just pressed the button
  if (tweetButtonReading != lastTweetButtonState)
  {
    // reset the debouncing timer
    lastTweetDebounceTime = millis();
  }

  if (searchButtonReading != lastSearchButtonState)
  {
    // reset the debouncing timer
    lastSearchDebounceTime = millis();
  }

  if ((millis() - lastTweetDebounceTime) > tweetDebounceDelay)
  {
    // whatever the tweetButtonReading is at, it's been there for longer
    // than the debounce delay, so take it as the actual current state:
    // if the button state has changed:
    if (tweetButtonReading != tweetButtonState)
    {
      tweetButtonState = tweetButtonReading;
      // only toggle the LED if the new button state is HIGH
      if (tweetButtonState == HIGH)
      {
        ledState = !ledState;
        Serial.print("TWEET\n");
      }
    }
  }

  if ((millis() - lastSearchDebounceTime) > searchDebounceDelay)
  {
    if (searchButtonReading != searchButtonState)
    {
      searchButtonState = searchButtonReading;

      if (searchButtonState == HIGH)
      {
        ledState = !ledState;
        Serial.print("SEARCH\n");
      }
    }
  }
  digitalWrite(ledPin, ledState);
  lastTweetButtonState = tweetButtonReading;
  lastSearchButtonState = searchButtonReading;
}
Conclusion
This example only scratches the surface of what we can achieve using Twitter, Processing and Arduino. I would recommend reading through the Twitter4j example and really exploring what else you can achieve. In the future I will be adding examples of taking data from other web services such as Instagram and Facebook or weather data and showing you how you can quickly grab and use data with Arduino and Processing.
Leave a comment and tell me how you got on.
